You’ve probably heard of Adobe Photoshop, even if you aren’t a professional graphic designer. This awesome program is helpful for all kinds of business and personal uses. While it can seem intimidating or overwhelming, learning how to use Photoshop can be easier than you think.
Figuring out how to use Photoshop can be a huge help while you build a dropshipping business. You can use it to create graphics like t-shirt mockups for your website, edit and enhance product photography, or make advertisements like banner ads and sales graphics – just to name a few.
There are dozens of Photoshop tutorials and how-to’s that can show you the ropes, including Photoshop tutorials for beginners all the way up to experts.
If you have no experience using the image software, don’t worry. This tutorial will show you the basics of getting started and learning how to Photoshop pictures. Once you learn the basics, you can move on to more advanced Photoshop tutorials.
Post Contents
How to Use Photoshop
Adobe Photoshop is an imaging and graphic design software used by thousands of people in many different roles across the world. Not only is it for photos but you can use Photoshop for designing websites, editing videos, and creating 3D artwork. Before you can get started with Photoshop you will need to purchase a plan and download Photoshop onto your device. Once you have downloaded the software you can start to get to know the interface which is very intuitive.
Introduction to Adobe Photoshop
As a beginner in Photoshop, it’s important to understand the anatomy of the interface before you get started. When you open the program, you’ll see the main menu along the top, like other programs. Along the left side, you’ll see a sidebar that shows the main tools. On the right side, you’ll see the color tool and the layers tool.

→ Click Here to Launch Your Online Business with Shopify
How to Open a Document in Photoshop
To create a new document or open a file on your computer, click “File” on the top left menu. Select “New” to create a new, blank document. Or click “Open” to go through your computer and open an existing file.
When you create a new document, a dialog box will pop up. In this window, you can name the file and select the size and resolution you want. This is helpful if your website requires a certain file size to display photos properly. Our photo dimensions are 880 pixels wide by 450 pixels tall. For resolution, 72 pixels/inch will work for online images. But if you want high-quality for print, we recommend 300 pixels/inch. (Warning: this will make the file size much larger, so be careful.)

Click OK and voilà! You’re ready to work.
Keep in mind that Photoshop will “lock” this new document, which keeps you from making edits directly to that layer. To unlock it, just click the lock icon in the layer’s name and it will disappear. Keep reading to learn more about layers.
Photoshop Toolbox
The toolbox in the left sidebar will be your best friend. The tools are organized into groups based on what they do:
- The top section features selection, cropping, and slicing tools. Use these to select parts of your images that you want to edit or enhance, or crop and slice out parts you want to exclude.
- The second section features retouch and paint tools. Use these to get rid of unwanted spots on product items, draw on your image, erase certain parts, color them in, or enhance them by sharpening or blurring.
- The third section is drawing and typing tools. Use these to write text over your image or draw images onto them by hand using the pen tool. We’ll go over the pen tool later.

Image credit: Tutorial9
Every time you click one of the left sidebar tools, you’ll see the tool’s options pop up under the top main menu. We’ll go over these as we discuss each tool.
How To Use Photoshop Actions
How to Use Layers in Photoshop
Speaking of layers, this is a critical feature to understand when you’re learning how to use Photoshop, even for the most basic Photoshop tutorials.
You might find that Photoshop isn’t doing something that you want it to, only to discover that it’s an issue with your layers. Having basic knowledge of this feature can help to avoid road bumps and frustration when you’re using Photoshop.
You can think of layers like sheets of glass that are stacked on top of each other. When you use multiple layers, it’s easier to edit one part of your image without messing up the rest of the final product. You can easily add or delete layers, as well as “hide” them by clicking the eyeball icon to the left of each layer’s name.

In many cases, Photoshop will automatically create a new layer for your action. For example, if you use the type tool to write on the background image, or if you paste in another image onto your document, it will create a separate, unnamed layer.
In the example above, you can see three layers: one for the logo at the bottom, one for the text, and one for the background image. We strongly recommend that you name your layers when you work, otherwise it can get confusing. To do this, just double-click where it says “Layer X” and type in whatever you want.
Now, if we want to move the logo around, we can just click the logo’s layer and move it, without disturbing any other parts of the document.
How to Use Pen Tool in Photoshop
The Pen tool lets you draw your own shapes. It has four different options:
- Standard Pen to draw curves and straight segments
- Curvature Pen to draw straight segments and curves intuitively
- Freeform Pen to draw freely, like you’re using pen and paper
- Magnetic Pen to draw paths that snap to the edges of certain defined edges, for more precision
We’ll go over how to use the standard Pen tool for now. For more advanced tips, look up Adobe Photoshop tutorials on the pen tools.
Select the standard Pen tool by clicking and holding the pen icon and choosing the one that says “Pen Tool.” You can also go through the different Pen tools by clicking the main icon on the toolbox menu, and then typing “shift + P” as a keyboard shortcut.
Every time you click your document, you’ll create an anchor point. Anchor points act as a corner, or a point where your shape curves.
For example, you can draw a star by clicking all the places where you want the star’s corners to be. To close the star, click the first anchor point you drew.

Image credit: Adobe
To draw a shape with curves:
- Click where you want the first anchor to go. But don’t release – instead, drag the mouse so that you create direction lines that will shape the curve. The shape of your curve will depend on the length and slope of your direction lines. Release the mouse click when you’ve drawn your direction line.
- Click where you want your curve segment to end, which is where the curve will change its angle or direction. Say you want to make a C-shaped curve. To do this: click to create your second anchor point, then drag the mouse in the opposite direction you dragged to create the first direction line in step 1. If you want to make an S-shaped curve instead of C-shaped, drag the mouse in the same direction as your first direction line.
- Repeat this process until you have the right shape. Note: you can move any of your anchor points or change the location of any of your direction lines at their endpoints. To do this, hold the “Control” key down before you click any of these points, and keep holding it until you’re done. If you accidentally create an extra point by forgetting to type the Control key, you can type “Control + Z” to undo to the last step (or you can click Edit → Undo in the top menu). Control + Z works for anything you do in Photoshop, so remember this handy shortcut.

Image credit: Adobe
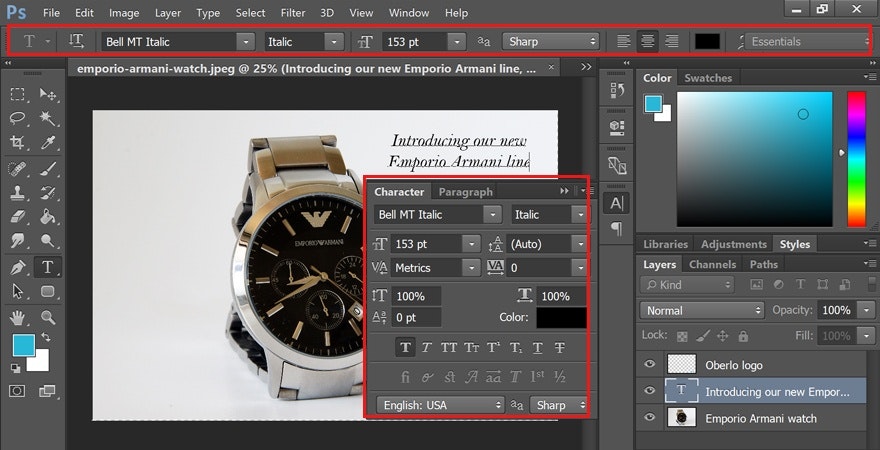
How to Use the Type Tool in Photoshop
The Type tool is how you’ll write words onto your image. When you hold down the Type tool icon in your left toolbox, you’ll see the option to type horizontally or vertically.
Like all the other tools, more options will show up under the main menu when you click it. You can also edit using the Character panel, which gives you a few more options.
Photoshop comes built in with plenty of font styles, but you can always install your own if you have a custom font for your brand. This can be done by installing the OTF or TTF file into your fonts folder on your Mac or PC. When you restart your computer, the font should be available in Photoshop.
The Type tool has a lot of options, including changing:
- The size and color, as well as styles like italics, small caps, underline, strikethrough, superscript, and subscript
- The spacing between each line of text, as well as the spacing between each letter
- The vertical and horizontal scale of your text, or how tall or wide it is

How to Use Gradient Tool in Photoshop
A gradient is a smooth color transition between two or more colors. Gradients make great backgrounds for product photography or advertisements. They can be a simple way to add some color and a professional look.
The Gradient tool lets you choose from preset options, or you can create your own custom gradient.
To create a gradient:
- Click the paint bucket icon. Hold it down until the menu pops up. Select “Gradient Tool.”
- Use the option menu that shows up under the main menu bar. If you click the dropdown menu, you’ll find the preset gradients to choose from.
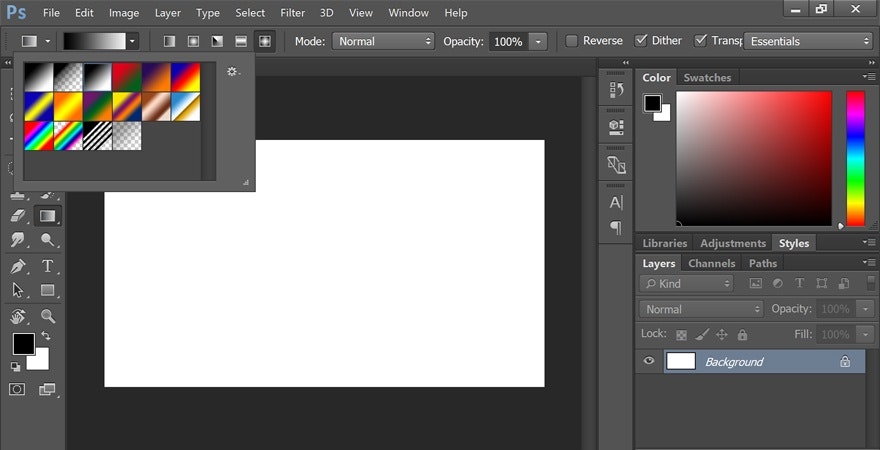

- You can also click the bar instead of the dropdown option. When you do this, the Gradient Editor will open. In this dialog box, you can choose one of the presets and make your own changes if you wish. If you double-click the colored stops that show up on the line below the “Smoothness” box, you can choose custom colors for a preset gradient pattern.

- Once you choose the gradient options you want, click OK. Now you can draw it onto your document by clicking the starting point, holding your mouse down, and dragging the line to the point where you want the gradient to end. For example, if you want a diagonal gradient, you can click the top left corner of your document and drag to the bottom right corner.

- Photoshop will create a gradient that fills the layer.

In the top menu, you’ll see five total gradient options:
- Linear gradient: A straight line, which is the example above.
- Radial gradient: A circular pattern, going outward symmetrically from the starting point.
- Angular gradient: A counter-clockwise sweep going around your starting point.
- Reflected gradient: A mirror linear gradient on both sides of your starting point.
- Diamond gradient: A diamond pattern from middle to outer corners.

Image credit: Adobe
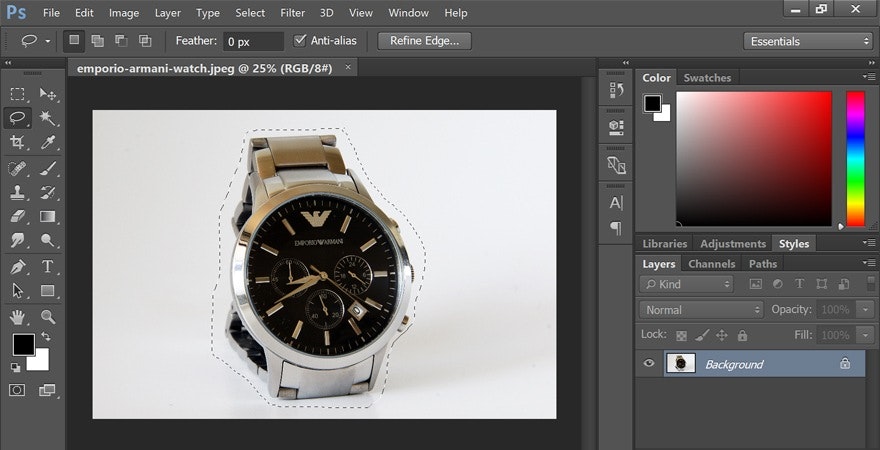
How to Use Lasso Tool in Photoshop
The Lasso tool helps you to select certain parts of an image so that you can isolate it, cut it out, or edit/enhance it separately from the rest of image. This is different from the rectangle or circle-shaped marquee tools, because you can create a custom shape instead of a rectangle or circle.
There are three options for the Lasso tool:
- Standard Lasso. To use this, simply draw the shape you want to cut out while holding down the mouse click. It’s recommended to make your way back to the starting point to control the way the selection closes. If you don’t go back to the starting point, it will draw a straight line between the start and end point to close the selection.

- Polygonal Lasso. This tool lets you draw a polygon with straight sides. Instead of dragging the mouse to create the shape you want, you can click every point where you want to end a line of your polygon.

- Magnetic Lasso. This tool is “smart” for better precision. It automatically snaps to the item you’re selecting so that you can select it with better accuracy than by hand. Just click your starting point at the edge of the item and hold down the mouse as you trace the item. When you release the mouse click, Photoshop will create a selection.

If you want to make a certain part of your selection bigger or smaller, you can add to your selection by holding down the “Control + Shift” keys while you draw more, or by holding down “Control + Alt” to subtract from your selection. You can also accomplish this by selecting the “Add to selection” or “Subtract from selection” options in the Lasso tool’s menu bar that shows below the main menu bar along the top of the screen.
Again, if you accidentally de-select, you can just type “Control + Z” and it will come back. Lifesaver! If you want your selection to go away, type “Control + D” for “deselect.” This works for any selection in Photoshop, not just Lasso selections.
4 Advantages Of Photoshop For Small Businesses
- Consistent Branding
Small businesses can find it hard to develop consistent branding without having a design tool to rely on. Adobe Photoshop can help you create a brand across many different platforms that your audience can identify easily and clearly, making it easier for them to choose to buy from you. - Top-Class Product Images
Creating high-quality product images can be the difference between enticing customers to buy your product, or visitors choosing to buy from your competitors. Product photos are the closest thing to your real product for online shoppers. By using Photoshop to make the images pop you can build trust in your brand and make your website visitors want to buy from you over other brands. - Great Marketing MaterialNothing is better than seeing great marketing material for a brand across social media, email marketing, PPC, and other marketing channels that screams social proof. With Photoshop you don’t need to hire a freelancer to create assets for your new campaigns. You can create these yourself through using the plethora of photoshop tutorials for beginners.
- Web Design
When you are a small business you might not have a web designer or developer as part of your team. If you choose to work with a web design agency you need a method of creative communication to show what you need from them. Photoshop is a great tool for this as you can download a website template PSD which you can customize for requirements and send this to your agency to work with.
Conclusion
When you’re starting a dropshipping business, it can be invaluable to have some image editing skills. Learning how to Photoshop pictures through basic photoshop tutorials are a great way to teach yourself. In addition to this tutorial, you’ll find loads of Adobe Photoshop tutorials like Photoshop tutorials for beginners, intermediate users, and experts.
With a simple Google search, you can learn how to use Photoshop at the right pace for your time, and at the right level of skill.
As your skills improve, you’ll be able to control more of your digital assets without having to rely on a design expert. When you learn Photoshop, it can save you time and money, and ensure that everything turns out just the way you want.
What do you plan to use Photoshop for in your dropshipping business? If you already use it, what do you use it for? Tell us all about it in the comments below.